Background

Friday, June 8, 2012

Oreo Pops!


Ever since I had my first cake pop at Starbucks last year, I've been obsessed.  (Cake pop tutorial post to come later!)  But let's face it, cake pops are a PAIN to make.  They are so darn tasty and cute, but man do they take a lot of work.  Enter Pinterest and howdoesshe.com's Oreo Cookie Suckers.  They are just as cute and fun as cake pops, but you get to cut out some of the steps!  Don't get me wrong, the process is still very involved, but how can you not love these?

Here's how I made mine.

What you'll need:
1 pkg of Oreos (I used Double Stuffed)
1 bag of white Wilton Candy Melts
1 bag of any other color Wilton Candy Melts
Sprinkles of your choosing
Lollipop sticks and Plastic treat bags (you can buy these at any craft store)
Skinny satin ribbon
Wax Paper


I have found it is easiest to complete all of one step before moving on to the next.  So first, carefully (and I mean carefully) unscrew the tops off of all of the Oreos.  Who knew Oreos were so fragile?  Don't worry if some of the cookies break, you can always glue them back together later with chocolate!

Pour about 1 cup of the white Candy Melts into a microwave safe bowl (glass or ceramic work best), and microwave at 30 second intervals, stirring in between, until they are mostly melted.  If there are small pieces that are still solid, stir the candy until smooth (they will usually melt on their own).


Use a lollipop stick to scrape away some of the filling and make room for the stick.  Dip the end of the lollipop stick in the melted chocolate.  Make sure you get a decent amount of melted chocolate on the stick -- this is what acts as the glue to hold the stick in place and hold the top on.  Place the chocolate dipped stick in the space you've created by scraping away the filling, and immediately top with the other Oreo half.  Repeat until all of the Oreos have sticks and are ready for dipping.

Now for the dipping...  Cover your work surface with wax paper.  Melt whichever color of Candy Melts you choose for dipping in the microwave using the steps above.  Using a rubber spatula, scrape all of the chocolate to the front of the bowl (as pictured below).  Hold the bowl in one hand and the Oreo pops in the other.


Dip one side of the Oreo pop into the melted chocolate to coat.  Flip over and dip the other side.  Roll the edge of the Oreo to cover the rest.  Tap gently on the side of the bowl to remove the excess chocolate.


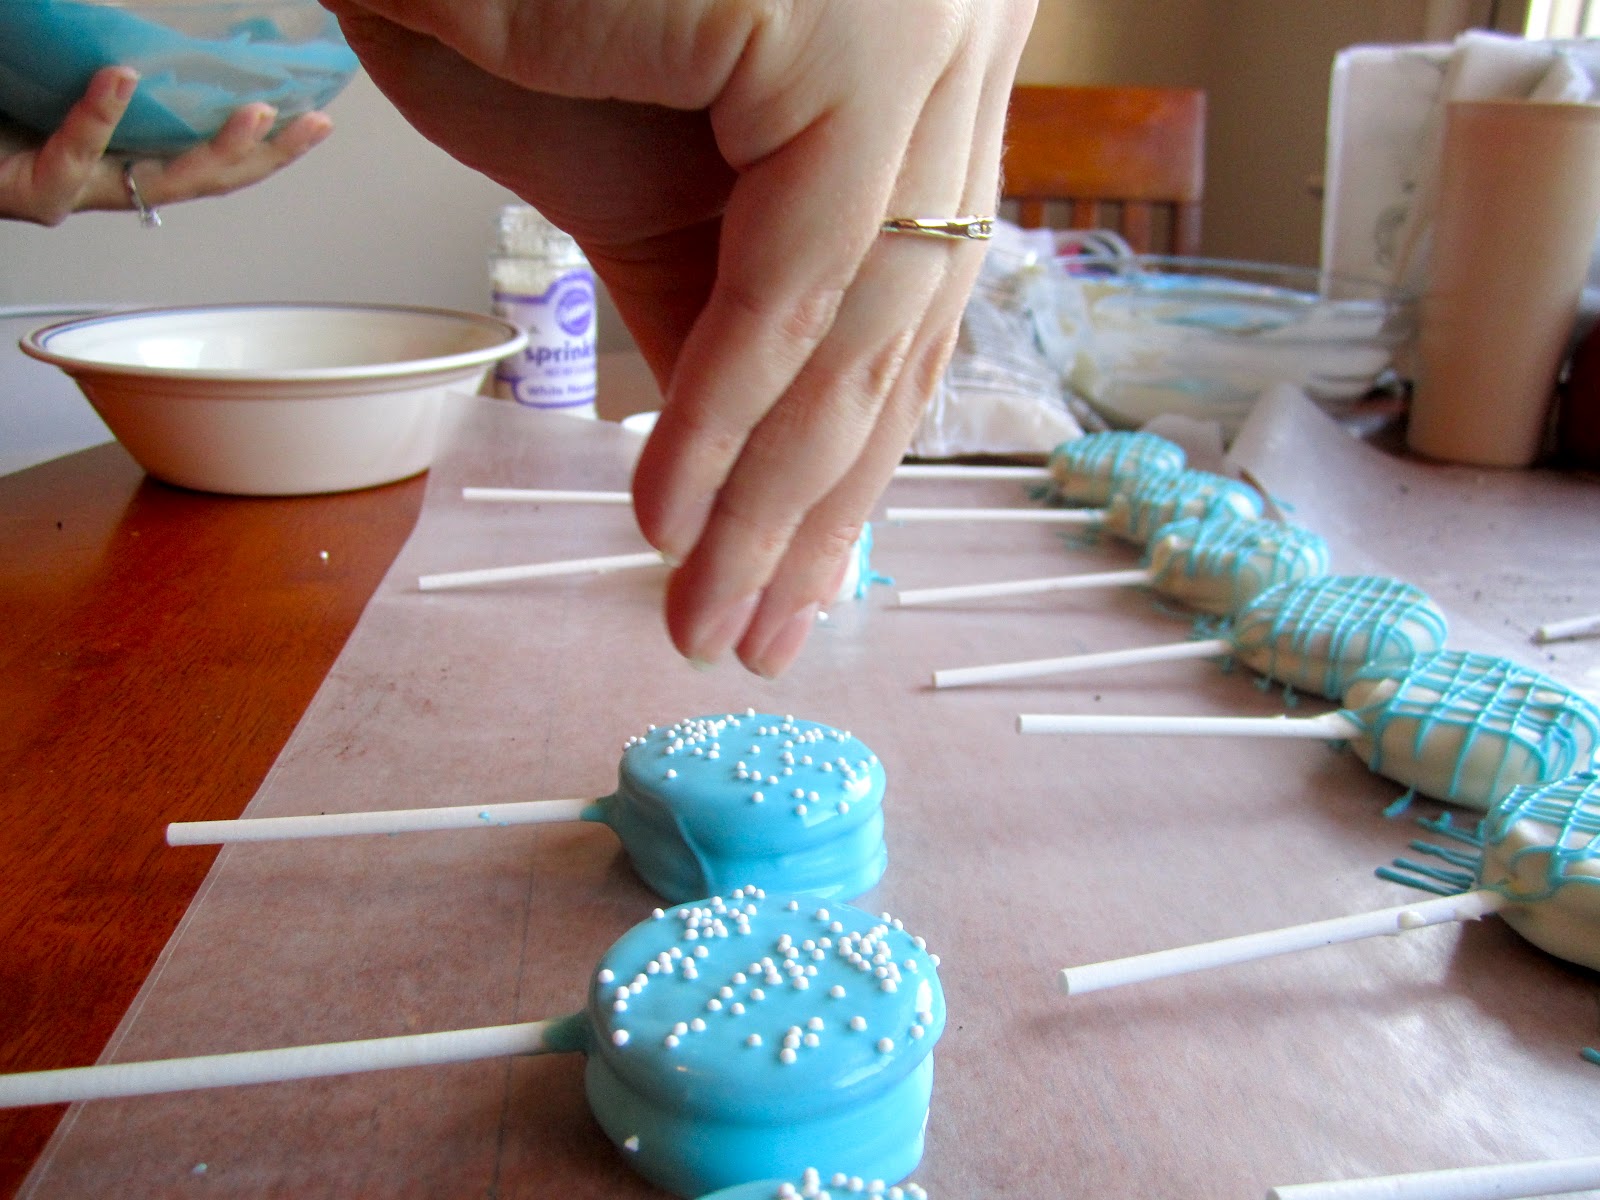
Place immediately on wax paper.  If decorating with sprinkles, do so at this point before the chocolate sets.


Since I was making these for a co-worker's baby shower (baby boy, obvi), I dipped half of mine in blue chocolate and decorated with white sprinkles, and the other half I dipped in white chocolate and drizzled with blue chocolate.

To get this drizzle effect, you'll need to use a zip lock bag.  Fold the top down to make the process neater, and pour/scoop in some melted chocolate.  Squeeze all of the chocolate into one corner of the bag, and twist the top (similar to using a pastry bag).  Snip the corner off of the bag (the bigger the snip, the bigger the line of chocolate will be).  Drizzle back and forth over the Oreo pop in one direction, then the opposite direction.

After you've dipped and decorated all of the Oreo pops, let them hang out on the wax paper for a while until the chocolate sets.  Cut enough ribbon for each of the Oreo pops (I'd say about 7 inches long).


Once the chocolate has set, put each Oreo pop into a plastic treat bag.


Tie a cute little bow on each.


And you're done!  How cute are these?


Just imagine the color and decoration combinations.


Saturday, May 26, 2012

Recipe: Beer Pizza Crust

Now that I have no more wedding to plan :( -- I can catch up on posting recipes!  I made this pizza back in November, so sorry for the delay!

There are two things that my husband can't get enough of... pizza... and beer.  So when I came across this recipe for Beer Pizza Crust on food.com, I knew we had to give it a try.  The only beer we had on hand was Keystone Light (we keep it classy), but it turned out great!  The recipe is very easy and can be made with things that you probably have on hand already.

I decided to use this crust as the base for a breakfast pizza.  Introducing -- Egg White Breakfast Pizza with Spinach, Goat Cheese, and Bacon.


Ingredients:
Pizza Crust
3 cups unbleached flour (plus more for dusting)
1 tablespoon baking powder
1/2 teaspoon salt
1 12oz can beer (room temperature)
olive oil

Toppings
6 egg whites
1 cup baby spinach
1 roma tomato
1.5 oz goat cheese
1 tbsp Real Bacon Bits (I use Oscar Mayer)


Directions:


Preheat oven to 450 degrees.
Combine flour, baking powder, and salt in a bowl -- combine.


Pour in the beer and mix well.  You may not need the whole can -- just pour most of it in, mix it up, and see how it seems.  Warning, the dough will be very sticky.


Dust your work surface liberally with flour and dump the gooey dough out, sprinkling with flour and rolling it around to coat it.


Knead it a bit to make it pliable, adding more flour if it is still too sticky.


Divide the dough in 2 (as this makes 2 nice sized pizzas).
Coat with olive oil and press into your pan of choice.


I used 2 round foil cake pans, and the crust was very thick.  You could easily get 3 pies of this size out of this if you wanted a thinner crust.


As the crust was very thick, I baked it by itself at this point for about 5-10 minutes.

While the crust is baking, add spinach and bacon bits to skillet and cook over medium heat until the spinach is just beginning to wilt.

Add egg whites and cook until the mixture is all opaque.  They can be slightly underdone as the whites will cook a bit more in the oven.

Remove the pizza crust from the oven and top with egg whites/spinach, sliced roma tomato, and crumbled goat cheese.

Return to oven and bake for another 10-15 minutes

And when all is said and done, you get THIS:


Go crazy and top with anything you want!  I topped the other crust with scrambled eggs, bacon, pepperoni, cheddar cheese, and barbecue sauce (a real MAN breakfast pizza for Zach).


I'm thinking next time I'll try out buffalo chicken pizza :)  Or maybe half whole wheat flour!

Saturday, January 21, 2012

Wire Wedding Cake Topper

Gorgeous wire cake toppers, like the one below from Allegro Art, are all over Etsy.  Unfortunately, they are expensive!  This one is listed for $25.  I consider myself to be a pretty crafty person, so I pinned it to my Wedding Cake board on Pinterest and thought, "Why couldn't I make that myself?"


After searching Amazon.com for gold aluminum wire, I found some for only $6.81 (with free Amazon Prime shipping, woo hoo!).  So when it came in the mail, I got to work!  I couldn't take pictures because (1) I didn't know what I was doing, and (2) my hands were pretty busy.  Anyways, I'll do my best to give you some tips/instructions on how to make your own!


Here's what you'll need:

  • Aluminum craft wire (I used 12 gauge gold, but it comes in many colors!)
  • Scissors or wire cutters
  • Pliers
  • Pictures of script letters that you like

Here are some tips:

Find letters that you like online or by trying out different fonts.  I used wire cake toppers from Etsy as my inspiration for the "M" and the heart, and found a script "Z" (below) to copy from Google images.


When making swirls for the ends of letters, it's best to twist it with your fingers, then use the pliers to bend the middle of the swirl in further (its hard to make that tight of a bend with just your fingers).


For my letters, I left extra wire at the ends as that is what will stick into the cake.


Make sure you are conscious of the way the wire needs to bend when coming out of a loop.  Look at the letters closely and plan ahead before you start bending the wire.  Once it bends one way, it's hard to make it bend the other way and still look nice and straight.

If you want a tight swirl, like you see on the stem of the heart, wrap the wire around your pinky finger a couple of times, then stretch it out a bit.  A pen or pencil would also make a nice even swirl.


I also played around with different ways to write the word "love" using one piece of wire.  I'm going to use the initials for our cake topper, but words like "love" and "i do" are common as well!


For points of letters (like the tops of the "M" and the bottom of the "V"), an easy way to make the wire go the other direction after the point is to make a loop.   You could also just bend the wire the other direction and use your pliers to squeeze the point together.  I liked the look of the loop better, but the "M" in the sample picture from Etsy at the top of this post looks very nice!


Make sure you have extra wire!  I wish I had taken a picture of my pile of reject toppers :/  Trust me, this takes some practice, and mine still aren't perfect!  Thankfully, I had 39 feet of wire to play around with.  I ended up throwing most of it away, but I did end up with some toppers that I'm very happy with!  And who knows, now that I have a better idea of what I'm doing, maybe I'll order some more wire :)

Thursday, November 17, 2011

Recipe: Pumpkin Pudding Parfait


Fall just makes me want to eat pumpkin.  Unfortunately, many delicious pumpkin things (pie, bread, cookies, muffins, donuts, ice cream -- the list goes ON and ON) are sugary, fattening, calorie filled guilt on a plate.  Well -- great news!  I have figured out a guilt free way to have all of that pumpkin-y spice-y goodness without all of the fat and calories.  Pumpkin Pudding Parfaits!

If you make this into little parfaits, they are so darn cute -- but let's be honest, it tastes just as good if you throw it all into a little bowl and call it a day.  Enjoy!

Ingredients:

1 box sugar free fat free instant vanilla pudding
1 cups skim milk
7.5 oz canned pumpkin puree (1/2 of a small can)
1/2 tsp pumpkin pie spice
1/2 tsp ground cinnamon
1 - 2 cups light Cool Whip
4 low fat cinnamon graham crackers
1/4 cup Planter's cinnamon pecans

Directions:

  1. Prepare pudding according to package directions.  Be sure to whisk for the full two minutes as the box instructs to ensure creamy texture.
  2. Whisk in pumpkin puree, pumpkin pie spice, and cinnamon.
  3. Allow to set up in the refrigerator for at least 5 minutes (longer is better).
  4. In 4 small glasses (I used juice glasses), spoon in about 1/3 cup of pumpkin pudding, spreading with a spoon to create an even layer.
  5. Next, add a layer of cool whip, followed by the last layer of pumpkin pudding.
  6. Top with a dollop of cool whip and sprinkle with crushed graham crackers and pecans.
  7. Enjoy immediately while graham crackers are still crunchy.

Servings:  4 parfaits
Nutrition Info:  Calories - 130, Fat - 3g, Dietary Fiber - 3g, Protein - 6g

Tuesday, October 25, 2011

Recipe: Pesto Crusted Fish

A couple of weeks ago at work, we had this AMAZING pesto crusted salmon left over from a meeting.  I have wanted to recreate the recipe ever since, and decided to give it a try with tilapia.


Ingredients:
Three 6oz tilapia fillets (or salmon, or whatever fish suits your fancy)
3 tbsp prepared pesto (I used Classico Original Basil Pesto)
3 tbsp 100% whole wheat italian seasoned bread crumbs
1 tbsp parmesan cheese
ground black pepper

Directions:
Preheat oven to 375 degrees.

Cover a baking sheet with foil and coat with non-stick cooking spray.

Place fish fillets on baking sheet and sprinkle with black pepper.  No salt is needed as pesto and parmesan cheese are both pretty salty.

In a small bowl, combine pesto, breadcrumbs, and parmesan cheese (hands or a fork will do).

Divide the topping evenly over the fish fillets, spreading with your fingers and pressing into the fish.

Bake for 10 minutes, then switch to broil to crisp up the crust for the last 2-5 minutes.

If the middle of the fillet flakes with a fork and is completely opaque, it's time to dig in!

Serve with steamed broccoli and brown rice pilaf for a healthy dinner.


Nutrition Info (per 6 oz fillet):  Calories - 236, Fat - 7g,  Carbs - 5.25

Recipe for Rice Pilaf (kind of) to follow in a later post!


Sunday, October 16, 2011

diy Gift : Personalized Pyrex


So.... the time has come... my friends have started to get married!  Unfortunately, at this point in my life, I'm unable to spend as much money as I'd like to on wedding gifts.  I have found that if you put some time and work into a gift and make it personal, it tends to be much more appreciated anyways!

When I found a tutorial from Make It and Love It for Glass Etching, I had to give it a try for my lovely friend Sarah and her to-be husband Josh!  I decided to write out my own instructions, because I don't have a Cricut cutter like Make It and Love It used.


Here's what you'll need:

  • Pyrex bakeware (I got a 2 piece set from Target)
  • Clear contact paper
  • Print out of the design you want to etch into the Pyrex (Make sure you print in mirror image, so the reverse of how you want the design to show up on the bakeware.  I had to reprint mine after this picture because I forgot)
  • Exacto Knife
  • Masking Tape
  • Paint brush
  • Armor Etch cream (A bit pricey from Michaels' but a little goes a long way!)


Print out your desired design.  It's best to choose a font that is fairly basic so it is easier to cut out with your Exacto knife.  I found a larger leaf pattern and used Photoshop to simplify it and make it easier to cut out, then arranged the text and graphic in Microsoft Word to print.


Make sure you print a mirrored image of your design.  If you're using a Mac, click Print, in the Copies&Pages dropdown, click Layout.


Check the "Flip Horizontally" image to print in reverse.


To make the "stencil," cut a piece of contact paper and affix it to the bottom of the Pyrex dish in the location you want to etch your design.  Make sure there are no bubbles.


Again, make sure you print out your design in reverse so that when you look at the dish from the top, the name reads correctly.  Tape the printed design over the contact paper.


Cut out each individual design/letter with the Exacto knife, being sure to cut through both the paper and the contact paper.  Go slowly and be very careful.  If you make a wrong cut, you'll have to apply a new piece of contact paper and start over on that letter.


After you have cut out the shape, use the Exacto knife to lift the edge of the shape up, and peel it off.  On letters with holes, like "D," be sure to leave the center of the letter in place.


Continue on until you have cut out the entire pattern.


Remove the masking tape and paper, leaving the contact paper "stencil" in place.  Flip the dish over to see what the pattern will look like right side up.  At this point, use your Exacto knife to smooth out any rough cuts.


Use a paint brush to liberally apply the Armor Etch cream to the stencil, being very careful to avoid contact with your skin!  This stuff can eat through glass -- let's not see what it does to skin.  Make sure you keep the cream inside the edges of the contact paper to avoid unwanted etching along the edges.


Apply the cream to the entire stencil and allow to sit for 15 minutes.  The Armor Etch bottle says to wait 5 minutes, but I felt that the longer time produced a better "etch."  As it sits, the cream will tend to goop up in certain places -- so you can move it around with your paint brush if you'd like.


After the 15 minutes is up, rinse off the cream with warm water and admire your new, personalized, Pyrex dish!  A lot of work goes into it, but if you take your time, the results will be fabulous :)


Enjoy, Sarah and Josh!  May you live happily ever after and never lose your Pyrex :)

Saturday, October 15, 2011

Recipe: Stuffed Zucchini


Let's just get this out of the way -- I LOVE ZUCCHINI.  I use it in recipes every chance I get!  The first time I made Stuffed Zucchini, I got the idea from Food.com (well, at the time it was still Recipezaar), but I couldn't find a recipe that I loved.  So, I made my own!  Serve with whole wheat spaghetti, a nice salad, or both!


Ingredients:
3 medium/large zucchini
24oz jar of your favorite spaghetti sauce
20 oz. extra lean ground turkey breast
1/2 red bell pepper
1 jalapeno pepper
1/2 medium onion
1/4 cup italian seasoned Panko breadcrumbs
1 egg white
1/2 tsp garlic powder
1/2 tsp salt
1/4 tsp black pepper


Spray a 9x13 pan with cooking spray.  Spread about a cup of the spaghetti sauce into the bottom of the pan to keep the zucchini moist as they bake.


Cut the ends off of the zucchini.


Cut each zucchini in half lengthwise.


Using a spoon, scrape the seeds out of each zucchini half to create zucchini boats, reserving the pulp.  Place zucchini in pan.


To make the filling, place the ground turkey in a large mixing bowl.  Chop the zucchini pulp and add 1/2 cup to the ground turkey.  

I decided to add this in as I felt bad wasting it!  You could reserve the rest to use in place of oil for baked goods.


Remove the seeds and ribs from the red pepper and jalapeno and finely chop.  Dice onion as well and add these to the bowl.


Add in egg white, 1/4 cup breadcrumbs, 1/2 tsp garlic powder, 1/2 tsp salt, 1/4 tsp black pepper.  Mix to combine -- don't be afraid to get your hands dirty!  I've found that's the best method.


Divide the filling among the zucchini.  Depending on the size of your zucchini, you may have extra filling, but it works really well for stuffed peppers as well, so just find something else to stuff!


Cover the zucchini with some of the remaining spaghetti sauce -- I didn't end up needing the entire jar.  Bake at 350 degrees for about 40 minutes.


Then cut into the meat to make sure it is no longer pink in the middle.


Sprinkle with mozzarella cheese and bake for an additional 10-15 minutes.


The finished product!


Nutrition Info (per 1/2 zucchini):  Calories - 210, Fat - 3g, Carbs - 18, Fiber - 3.5